As an update to my earlier post on this subject, I’m offering this improved version based on Crouton. This approach is Debian-based rather than using Arch Linux, but the result is functionally equivalent.
Read or browse the original post for more context, project goals, and background, or simply follow the steps below.
To set up LAMP on your ARM ChromeBook, follow these steps:
1. Set up developer mode on your ChromeBook
- Hold down [esc] and [refresh] and tap the power button. This will bring up the scary ‘recovery’ screen.
- Press [ctrl+d] to go into developer mode (there’s no prompt – you have to know to do it). Note that all local settings and data will be wiped.
- After the machine reboots into developer mode, you’ll be at the scary ‘not verified’ startup screen. Wait 30 seconds for it to boot, or press [ctrl+d] to start immediately.
2. Install Crouton
- Download the Crouton installer to your Downloads directory.
- Press [ctrl+alt+t] to open a terminal tab.
- Enter the following commands in your terminal:
shell
sudo sh -e ~/Downloads/crouton -r wheezy -n debian -t cli-extra
and follow the prompts to install Linux (Debian’s “wheezy” distribution, in this case).
Feel free to explore the Crouton documentation for a lot more detail on using other distributions or installing a graphical environment. In this case, I chose Debian over Ubuntu due to issues with running MySQL in a chroot on Ubuntu – Debian ‘just worked’ for me.
3. Install the LAMP stack
- Enter the chroot
sudo enter-chroot
and install the LAMP stack:
# update apt-get
sudo apt-get update
sudo apt-get -f install

# add LAMP components.
sudo apt-get install mysql-server mysql-client phpmyadmin

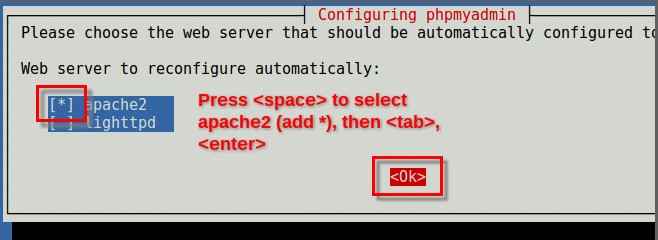
Be sure to enable apache integration when installing MySQL as part of your LAMP stack.
Note that phpmyadmin will set up php and MySQL to work with apache2, so you don’t need to edit any configuration files to get a basic LAMP setup up and running.
4. Add optional components
- Allow media/content uploads to WordPress
# Create and set permissions for the default WordPress upload folder
mkdir -p /var/www/wordpress/wp-content/uploads
chown www-data:www-data /var/www/wordpress/wp-content/uploads
Note: this folder and user is for Debian/Apache2 only.
- Add sendmail capability
# Add a mail sender
sudo apt-get install ssmtp

# Set up ssmtp
sudo nano /etc/ssmtp/ssmtp.conf
Replace everything in
ssmtp.confwith the following (replace the email address and password with valid gmail credentials):root=mygmailusername@gmail.com mailhub=smtp.gmail.com:587 AuthUser=mygmailusername@gmail.com AuthPass=mypassword UseSTARTTLS=YES
- Add useful command-line tools
sudo apt-get install vim git wget curl
- Set up and install WordPress
- Create a new database: navigate in your Chrome browser to http://localhost/phpmyadmin (use root + whatever password you specified on the MySQL install to log in). Create a new user (click “users” and add a user – be sure to select the radio button to create a new DB and grant all privileges).
For example, create a user called ‘wordpress’ with a db called ‘wordpress’ and a generated password. Copy the password for later use, either in the WordPress installer or using wp-cli.
- Download the latest WordPress code:
cd /var/www
sudo curl http://wordpress.org/latest.tar.gz | tar xz
- Navigate to http://localhost/wordpress and complete the WordPress 5 minute install
Note: If the installer cannot write the WordPress configuration file, you may need to set permissions to the wordpress directory so that apache can write there. In Debian, the apache user is
www-data - Create a new database: navigate in your Chrome browser to http://localhost/phpmyadmin (use root + whatever password you specified on the MySQL install to log in). Create a new user (click “users” and add a user – be sure to select the radio button to create a new DB and grant all privileges).
- Install wp-cli – makes WordPress setup a snap.
- If you’re using Annotum 2.0, you also need the
php5-xslmodule:sudo apt-get install php5-xsl sudo php5enmod xsl sudo service apache2 restart
That’s it! You now have a functioning LAMP stack on your ChromeBook, running Debian. Feel free to explore the Crouton documentation for a lot more detail on using other distributions, installing a graphical environment, etc.
Questions? Comments? Please provide your feedback below!
One thought on “A Better ARM ChromeBook LAMP Stack based on Crouton and Debian”
Comments are closed.